If you follow me on Instagram, then you are (perhaps painfully) aware of the fact that a photoshoot occurred at the house over the weekend. This one was actually orchestrated to get my year-old house tour updated with the past 365 days of projects. That said, I scheduled one more for this evening that WILL make it to print (locally) in the next couple of months – More on that soon. In the meantime while planning for these two shoots, I wanted to be sure that the house looked as warm and welcoming as possible. What’s the best way to do that? Flowers, of course!
.jpg)
Source: House of Earnest
Since I didn’t have the budget for florist-made arrangements, I decided to utilize a particular pin (seen above) to make my $20 grocery store bouquet look as professional as possible. Happily, Erin’s instructions, if you follow that source link, lay out the steps in an easy to follow manner, and I was able to transform the look of my blooms in no time at all.
.jpg)
.jpg)
Although they unintentionally look halfway decent in that photo above because of the angle I shot, they really did look almost exactly like the “Before” shot in my Pinterest image. The stems were far too long and the buds were bunched together in a too-tight configuration that wasted the effect of their unique silhouettes. The first step in rectifying the situation was to remove the rubber band and separate the flowers into piles by type.
.jpg)
.jpg)
After that I employed yet another Pinterest tip: using clear Scotch tape to mark out a grid on the top of my vase so that I could REALLY plan the placement of my flowers. This was the first time that I had used this trick on a large scale and it worked like the charm it promised to be. The tape ultimately made my finished arrangement feel full and lush thanks to the stem propping effect it created.
.jpg)
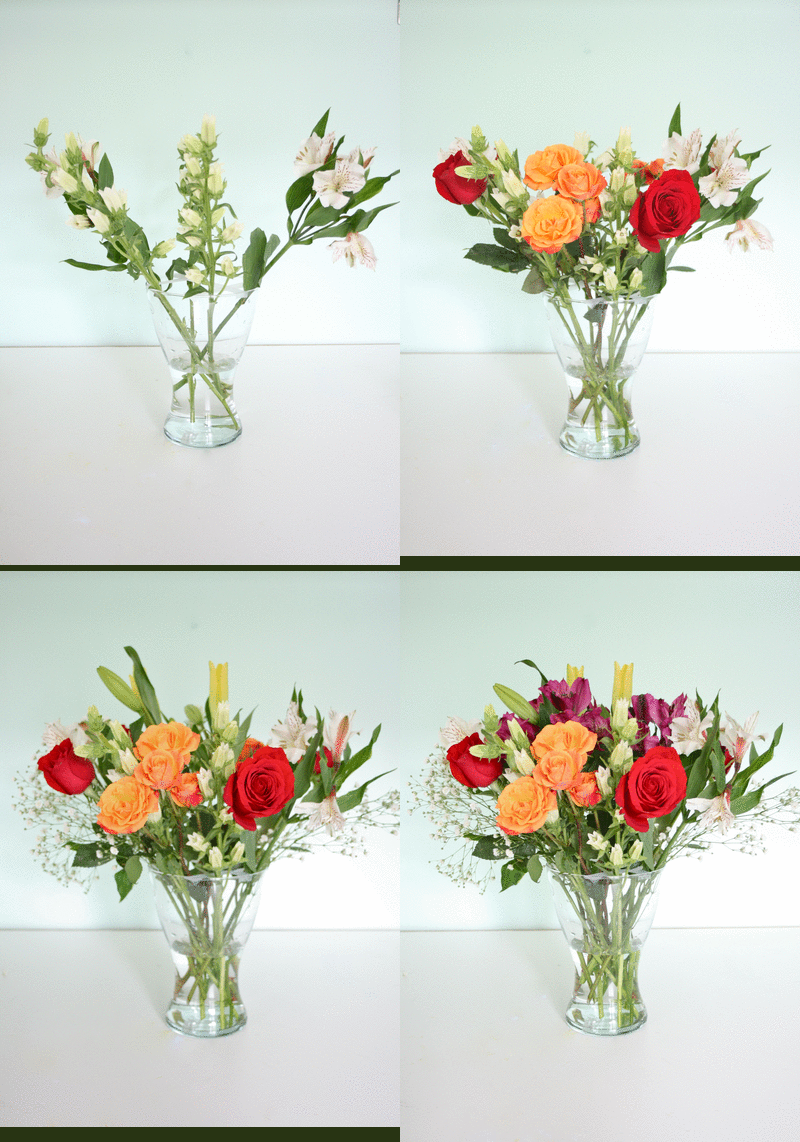
Using the tips gleaned from House of Earnest, I started with my greenery. My particular bouquet didn’t actually boast any greenery though, so I simply picked the leafiest, most neutrally colored blooms in the bunch to start. By not depressing them to the very bottom of the vase, instead leaning them a couple of inches up, I was able to push them a bit further out from the edge of the vase to achieve a thicker look in the end.
.jpg)
Next, I layered in my statement makers – the roses. My bouquet came with two different varieties of roses, some red and some coral, which made for a pretty big impact. By allowing them to sit on top of the leafier blooms, they become something like a focal point. After that, I filled in with Baby’s Breath and a couple of Lilies – that, of course, didn’t open until after Saturday’s shoot…
.jpg)
.jpg)
And then lastly, I finished off the arrangement with the purple Alstroemeria. In the end, I was really thankful for the purple flowers because without them the arrangement felt a little expected and bland. But that pop of rich peacock color really brought the flowers to life.
.jpg)
And since it’s always fun to see a general progression in quick time lapse format, I quickly whipped together this little GIF slideshow. You can really see just how well those purple Alstroemeria complete the arrangement when shown in quick succession.

via picasion
This was such a fun pin to recreate. I’ve never considered myself much of a flower pro, but the simple steps in this project made me feel like I COULD tackle this type of styling on my own, saving me time and money.
.jpg)
.jpg)
.jpg)
Can’t wait to share the house tour photos with everyone!
P.S. Have you entered the Lulu & Georgia giveaway yet? Still time to submit your name to win that gorgeous L&G pillow! Contest ends tomorrow.


